Tuesday, July 30, 2013

Back To Making Cards Today

Renee Wayland posted a cute card today.  On hers, she welded some words onto a narrow rectangle, which makes it so simple to apply and keep the lettering straight.  It was a great idea.  I made these today before I forgot to give that technique a try.


Another card using a paper with an oversized design on it.


Sandblasted Mugs

 Florida Gators logo on a ceramic mug.
 St. Louis Cardinals logo on a beer stein.
St. Louis Cardinals logo on a ceramic mug.

Sunday, July 28, 2013

Sand Blasted Ceramic Mug

I wanted to see if I could sandblast a ceramic mug without ruining it.  I like the way it looks.  The etching pretty much just removed the top layer of the colored glaze.

My New Hobby

I've been decorating some glass items with vinyl and in the past I have used etching cream on glass.  Lately, I've been seeing a lot of things online about sandblasting or air erasing on glass and decided I wanted to give it a try.

DH and I went to Tractor Supply today and purchased this sand blasting cabinet.


Then I called my sister, who recycles everything she can, and asked for some of her glass jars to experiment on.   This is my very first project.  Woo-hoo!  My name etched on a pickle jar!  LOL!

You can see that I didn't get it blasted uniformly.  Silhouette vinyl was used for the stencil and the grit pretty much chewed it up so the edges of the design aren't perfectly smooth.  We had to play with the air pressure a bit and finally settled on 50 psi.  I did a few more pickle jars and a couple of empty wine bottles and decided it was time to do a "real" project.

I chose a heavy beer stein and put the Browning deer logo on it.  This time I used Oracal 651vinyl for the stencil.  It has more adhesive than the Silhouette vinyl so the grit didn't get underneath the small pieces of the design.

This one turned out really nicely so now I have a new hobby to take up my time!  Shirley, aka Okieladybug, and I are doing a craft show in December so I'm going to get busy etching items for our booth.


Saturday, July 27, 2013

Birthday Card With Vellum Overlay

The vellum was embossed with a Cuttlebug folder and layered over a piece of light blue cardstock.  The party hats are a Martha Stewart punch.  The flame on the candle is an image from 3 Birds on Parade cartridge.  I just cut a narrow strip of blue glitter paper for the candle. 


Friday, July 26, 2013

Vellum Butterfly Card


Masked and Stamped Butterfly Card

This card does require a couple of extra steps but it's not hard to do at all.  I used blue painter's tape to mask off the sentiment after I printed it on the card front, but a piece of cardstock will work too.


Once you have your mask in place, stamp some leaves and flowers to surround the sentiment.  Be careful when you remove the tape so that you don't damage the card stock.


The large dark pink butterfly was done with a Stampin' Up punch.  The smaller one is a Martha Stewart punch.  They're embossed with a Cuttlebug swiss dots folder and I added some pearl pen dots onto them


Wednesday, July 24, 2013

Sweet Life Stamps Card # 3


Using the same technique as card # 2, I stamped the image onto vellum and laid it on top of the sentiment stamped onto white cardstock.

I don't care for the way the edges of the vellum curl up and vellum adhesive is so light I wonder just how long it will hold vellum in place, so, there are glue dots on the corners, concealed with photo corners.

I like the way the sentiment looks underneath the vellum overlay and now that I've resolved the issue of attaching the vellum without the adhesive showing, I'll do this again.


Sweet Life Stamps Card #2

For this one I stamped the apple image onto a piece of vellum and colored it with Promarkers.  It's layered onto a piece of white cardstock with the sentiment stamped three times on it.

The lace borders were done with a Martha Stewart Punch.  The background paper is from Stampin' Up.


Sweet Life Stamps Card

This is one of the stamps in the stamp of the month set, Sweet Life, from Close To My Heart.  My set arrived today and I love the images.  I did some searching online for inspiration to use them and found a monotone card that looked great.  This is my interpretation of that card.

The cut out shape is from Elegant Edges cartridge, resized and cut with Make The Cut software.  I embossed the edges by hand using a stylus.


Tuesday, July 23, 2013

Oriental Themed Card


Three Diamonds Card

The stamp is from Stampin' Up's Lovely as a Tree set.  I cut the diamonds with my Cameo, matted all the shapes on black cardstock and added some burgandy buttons on the diamonds.  What looks like brads on the tree image is just a tiny punched out area, which lets the black mat show through.

This card was inspired by one seen in a magazine.

Dogs Rule

The paw prints, dog bone and dogs are clip art images found online.  I resized them and printed them in Hallmark software.  The dogs were colored with Promarkers and trimmed by hand.  This card was inspired by one seen in a magazine.


Monday, July 22, 2013

Celtic Knot Card - 30 Minute Card

Sometimes the most simple cards are the best.  I love the sentiment on this one.  It was inspired by one seen in a magazine.  The Celtic knot is clip art and I printed the sentiment with my computer.


Patriotic Card

Close to My Heart is offering sets of military/patriotic stamps.  A portion of the proceeds goes to the USO.  My friend, Sue Painter, sent one set to me since she knows I do cards for Operation Write Home.

OWH asks that we put "Any Hero" cards in our shipments.  They're to be directed toward the service men and women to thank them for their service.  I told Sue these would be perfect images for those cards.


Frog Card

The image is by Dustin Pike, colored with Promarkers.


Minion Cookies

These little guys called minions are in the Despicable Me movies.  After Despicable Me 2 came out, I saw all sorts of versions of making the minions using Twinkies on top of cupcakes.  I do not like cupcakes.  I don't like to bake them and they're such a mess to eat, that I decided I'd put mine on a sugar cookie instead.

Once a month, we have a wine group that meets for dinner and an informal wine tasting.  I took these as one of the desserts for the meeting.

I cut Sara Lee Twinkies in half and anchored them on top of the cookie with a small amount of icing.  Then, I piped icing around the base.  The goggles, hair, mouths and eyes were done with black icing.  The whites of the eyes are Smartees candies.

The ladies at wine group thought they were really cute.  I don't think anyone ate theirs, they took them home!


Sunday, July 21, 2013

Saloon Door Birthday Card

I saw this card on Splitcoast Stampers.  The person that designed it had some laser cut saloon doors.  Not only did I not have those, I couldn't find an image to trace or cut in Make the Cut or Silhouette software.

With a little research, I found a shape on the Elegant Edges cartridge that I modified, then cut in half to make the doors.  The louvers are a piece of Stampin Up striped paper.  The horse shoes are clip art.

I printed the sentiment on my computer.  Inside it says "Pardner" in the same old west font.


Saturday, July 20, 2013

30 Minute Card

This was printed in Hallmark card making software.  I found a clip art image of notebook paper and superimposed the text onto it.  Added a colored paper clip and voila!  Another 30 Minute Card!


Friday, July 19, 2013

Chocolate Hugs

The strawberry is from the Sweet Shop cartridge, cut with Make the Cut and my Cameo.  The sentiment was computer printed.

Up until two years ago, I'd never buy two sided paper.  It seemed like such a waste to only be able to use one side, and I could never decide which side to use.  I've moved past that now and two sided paper is what I look for whenever I visit a scrapbook store.  The background of this card is two sided paper by Bo Bunny.  I cut a 3" strip for the upper portion and a 1" strip for the bottom and turned that strip over to use the other print.


Thursday, July 18, 2013

Horses Running Card

The horse head stamp was given to me by my friend, Robin Bogle.  I love it since you don't even have to color it for it to be effective.

The running horses on the bottom are clip art I found online.

Southwest Chicken and Rice Casserole

We have Braum's ice cream and dairy stores in Oklahoma.  I ran in the other day to pick up some items and they had recipe brochures at the check out.  This is one of the recipes it included.  I'm going to type it out as in the brochure and then I'll type out how I made it for just the two of us.

It's super, super fast to make and delicious too!  The recipe says to bake in the oven, but I think it would work just fine in a crock pot for these hot summer days.


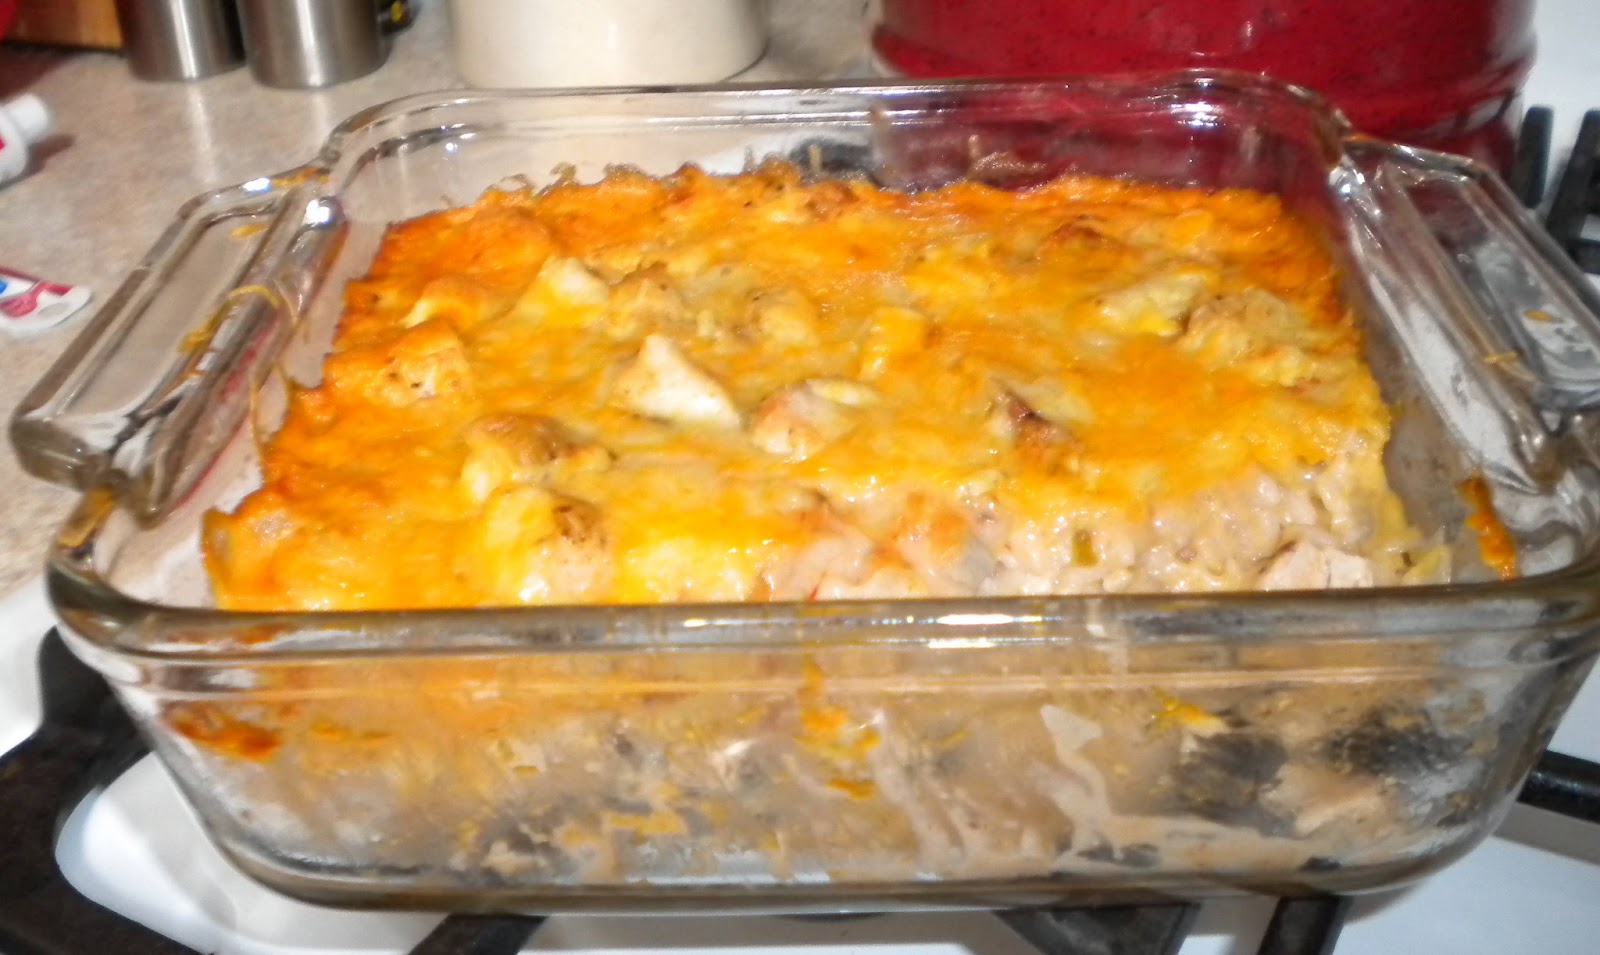
SOUTHWEST CHICKEN AND RICE CASSEROLE

1 bag fully cooked chicken fajita meat, chopped
3 packages Uncle Ben's Ready Rice
2 cups Braum's shredded Mexican-style cheese
1 can Cream of Chicken soup
1 can Cream of Mushroom soup
1 onion, chopped
1 cup salsa

Preheat oven to 350°, and spray a 9 x 13 baking pan with nonstick cooking spray.  In a medium sized bowl, combine the soups, onion, and salsa.  Place 1/2 of the rice in the bottom of the pan, then 1/2 of the chicken, 1/2 of the creamy soup mixture and then 1/2 of the cheese.  Repeat.  Top with cheese and bake  for 30-40 minutes or until bubbly.

The recipe doesn't say how many this will feed.  I'd estimate 6-8 generous portions.

Since there's just myself and DH, I had to cut the recipe down.  It still made an 8" square pan full and would easily be enough for four portions.


As you see, I had to sample it before I posted it on here!


My version of Southwest Chicken and Rice Casserole

1 cup Minute Premium Rice
1 cup water

Prepare rice according to box instructions and set aside.

1 package John Soules fajita chicken strips, chopped
1/2 can Cream of Chicken soup
1/2 can Cream of Mushroom soup
1/2 cup Pace Medium salsa
2 cups finely grated Mexican cheese blend
1/2 large onion, chopped

Combine the soups, onion and salsa.  In an 8" square baking dish, layer 1/2 of the rice, 1/2 of the soup mixture, 1/2 of the chicken and 1 cup of the cheese.  Repeat the layer, ending with the cheese.

I put the remaining half cans of soup in a container and froze them to use another time.  I'm too cheap to throw away half a can!  

I cooked mine on high in the microwave for 4 minutes to heat it thoroughly so it didn't take so long to bake in the oven.   Then I finished it in a 350° oven---since the dish was already hot, it only took about 10 minutes.

This would be so pretty on the table if you made it in individual ramekins and topped it with some pepper slices before you serve it.

This is another recipe "keeper"  and worthy of a recipe layout, IMHO!

Wednesday, July 17, 2013

Hoot 'n Holler Card

Using my Cameo and Make the Cut software, I cut the owl from the Hoot 'n Holler cartridge for this.  The sentiment was printed with my computer.


30 Minute Card

I stamped the flower with tuxedo black ink on the colored cardstock and trimmed it out by hand.  The center was accented with a Promarker.  It's pop-dotted onto the stamped image underneath.  The sentiment was printed with my computer.


30 Minute Card

I like the pop of red on the black and white card base.  Just some stacked rectangles, a paper flower with a Pearl Pen dot for the center and a punch out on the corner.

Donald And Daisy Duck Cards

 The image is from a 12 z 12 sheet full of Disney characters.
 I used my Cameo to cut the letters.  The shadow feature in Make the Cut software makes doing words super fast and simple!
When I got this assembled, all I could think of was John Deere tractor!  I don't care for the color combination I used at all.

These are just some quick cards that I thought would be suitable to send to a child. 

Monday, July 15, 2013

Mickey and Minnie Mouse Cards

Today at Michael's I found a sheet of paper printed with Disney characters in 1 3/4" squares.  I cut them apart and these are two of the cards I made this evening.

The heart and star images are from Mickey and Friends cartridge.  The names are from Mickey Font.  I traced them in Make The Cut software and cut them out with my Cameo.


Sunday, July 14, 2013

Kraft Cardstock Card

I saw this card by BashfulStamper posted on Pinterest and tracked it back to Splitcoast Stampers.

It's a wonderful way to use up scrap pieces of cardstock.

The front is kraft cardstock.  The colored inlays were all embossed with a Swiss Dots folder in my Cuttlebug.  I punched tiny flowers from another piece of kraft cardstock and used mounting foam to attach it to the card front.  The white flower centers were done with a Signo gel pen. The sentiment was printed in Hallmark card software.


Daisy Missing "U" Card

I used Hallmark software for the wording, an EK Success punch for the leaves and added some paper flowers with candy centers.  The edges of all the pieces were inked with Chestnut Brown.

Repeat Card

This past week, I have found myself without any inspiration at all to make cards!  Today, I scrolled through the photos of cards I've done in the past and repeated this one.

Thursday, July 11, 2013

My 79 Cent Storage Solution

One day after digging through a drawer that was full of packages of these adhesive backed pearls, I decided to put them onto an old fashioned shower curtain hook.

These come 12 to a package at any place that sells shower curtains.  They open up like a safety pin.


Just slide the pre-punched hole in the packaging onto the metal hook and snap it closed.


The hook will hold several packages, keeping them all together and easy to find.  When you need an item, just flip through them like a Rolodex, then open the clasp and slide the package off.  These packages open from the bottom, so I don't even have to remove them from the hook to get to the pearls.

I store mine in a drawer with other embellishments but it would hand nicely on a peg board too.


Tuesday, July 9, 2013

My Four Hour "30 Minute Card"

When I saw this on Pinterest, I knew it would make a great OWH card.  Once I read the instructions and materials list, I went to Stampin' Up online and bought what I thought was an SVG download of  the medallion with the intention of printing it in Hallmark card making software directly onto the card front.   What I got was a PNG file, that I realized I couldn't use!

Four hours later....after struggling to open the file in a size that was small enough to fit my screen and asking on Facebook for help on how to save the file in another format, I finally just imported it into Make The Cut software and printed it from there.

That meant I had to trim them by hand (since I still haven't settled down and forced myself to learn to do a print and cut!).


So, this is my four hour version of a 30 Minute Card.  If you have the medallion stamp from Stampin' Up, you could make a dozen of these in that length of time.

I'm hoping that once the CD of My Digital Studio arrives from Stampin' Up,  that I'll be able to print it directly onto a piece of cardstock and skip the hand trimming.  Hopefully the software will be simple to use.


Saturday, July 6, 2013

Two Butterflies Card

The background papers are Graphic 45 and Bazzil cardstock.  The butterfly is a clip art image.  I used a Stampin' Up sentiment and punch then added some self-adhesive pearls from Queen and Company.

The card looks better in real life than the photo.  Guess the Ott light made the background colors show up a little differently than they actually are.

30 Minute Card

A quick card done with a couple of stamps, two punches and some clip art images.

Friday, July 5, 2013

Bird Builder PUnch Card

Inspiration from Pinterest


Love You to the Core Card

The apple is from the Preserves cartridge; the mat is from Accent Essentials.  Both were modified and cut on my Cameo with Make the Cut software.   This card was inspired by one seen on Pinterest.


Wednesday, July 3, 2013

Pack and Play Kid's Stove

You have to love the internet!  It's an unlimited source of ideas and projects for crafters.  When I saw this Pack and Play Kid's Stove  I knew I had to make at least one for Christmas this year.

The supplies are quite inexpensive.  It took a $3.50 Sterlite 16 quart container, a package of plastic toy pans and food found at Ross, and about 2 feet of vinyl.

I'm hoping that my great-niece will enjoy it.  Since the container is not very large, she can take her kitchen with her in the car.  All the pieces fit inside and the lid snaps on to keep everything in one spot.

 The burners are just black and orange circles.
The knobs are black and white circles with a little rectangle cut by hand.
 I was so glad that I found the Betty Crocker cookware and food set at Ross today.  I've been putting off doing this project until I could find little pots that would fit the burners.
All the food, utensils and pans fit right inside the container, making clean up quick.