Last Monday I went back to Weight Watchers. I've been a Lifetime member for over thirty years and have managed, over the past 15 years, to pack back on every pound I'd lost to reach the Lifetime goal!
One of the reasons I chose to go was their new food program. It intrigued me that so many foods are now classified as "free".
This recipe came from a Taste of Home cookbook. I used their ingredients and modified some of the items to lower fat options. If you use the ingredients I did, you'll wind up with eight servings that count 6 points each.
I'd never used Fat Free Milnot before but it sure gives this dish a rich, creamy flavor. This turned out so well that it warrants a recipe layout for my Cricut cookbook!
Chicken Tetrazzini
8 oz. Ronzoni thin spaghetti, uncooked
½ onion, finely chopped
1 garlic clove, minced
2 tsp. Olive oil
3 T. cornstarch
14 oz. can chicken broth
12 oz. can Fat Free Milnot
13 ½ oz. cooked chicken
4 oz. can mushrooms, drained
½ tsp. Seasoned salt
4 T. grated Parmesan-Romano cheese
Paprika
I cooked two wings and two breasts from a cut up Smart Chicken in the can of broth in my pressure cooker. 10 pounds of pressure for about 25 minutes. If Smart Chicken is available in your grocery, I highly recommend it! Wonderful flavor because it's not fed any food with hormones, etc.
Removed the chicken from the broth and set aside to cool. Then I pulled the meat off the bones and wound up with 13 ½ oz. of cooked white meat.
Cook spaghetti according to package directions.
Put olive oil in a large saucepan and saute the onion and garlic for 3-4 minutes.
Mix the cornstarch in the chicken broth and add this back to the onion/garlic mixture.
Cook, stirring for about 5 minutes until it gets thick. Add canned milk and heat thoroughly.
Add the mushrooms, chicken, seasoned salt and cooked spaghetti. Turn this mixture into two 8” square pans or one large casserole dish. Bake, covered, at 350° for about 20 minutes.
Remove cover and sprinkle with the grated cheese and paprika. Pop back into the oven just until the cheese melts.
This is a recipe that I modified and did the Points count on for Weight Watchers.
Using the ingredients listed above, it makes 8 servings that are 6 Points each.
Tuesday, June 28, 2011
Prayer Card
Mary over at CardzTV has a video up showing her version of this card. She has a lot of great card ideas on her blog.
I wanted to use my favorite scripture, Numbers 6:24-26, so, using my Hallmark card software, I typed the text in and sized it to fit onto an A2 sized card. The software makes it so simple! You can see a virtual card front of whatever sized card you choose so you always know exactly how the image is going to fit onto the card.
Then, I printed the sentiment and marked center lines on the verses.
 I measured the sentiment (1.25" x 3.25") and using Design Studio software and the George cartridge, I placed a rectangle of that size on my mat. This showed me exactly how much room it would take to print the sentiment.
Elegant Edges has so many neat shapes on it and so I chose a scalloped oval and sized it to fit around the 1/25" x 3.25" rectangle. This is the white shape I printed the sentiment onto. Then I stretched the oval just a little to make the turquoise background oval.
After cutting the ovals out of white cardstock with my Expression, I placed them onto the printed images using the center lines to be my guide. I put a small piece of double sided tape on the back of each white oval to hold them in place and fed the printed sheet back through my printer. The sentiment printed perfectly onto the pre-cut ovals.

This is the first time I've printed sentiments onto pre-cut shapes by feeding them through my printer. It's going to give me a lot more versatility now that I've figured out how to do it. Making so many cards, it seems like I just keep doing the same things over and over sometimes! So I'm constantly looking for new ideas and techniques to provide me with some variety.
I wanted to use my favorite scripture, Numbers 6:24-26, so, using my Hallmark card software, I typed the text in and sized it to fit onto an A2 sized card. The software makes it so simple! You can see a virtual card front of whatever sized card you choose so you always know exactly how the image is going to fit onto the card.
Then, I printed the sentiment and marked center lines on the verses.

Elegant Edges has so many neat shapes on it and so I chose a scalloped oval and sized it to fit around the 1/25" x 3.25" rectangle. This is the white shape I printed the sentiment onto. Then I stretched the oval just a little to make the turquoise background oval.
After cutting the ovals out of white cardstock with my Expression, I placed them onto the printed images using the center lines to be my guide. I put a small piece of double sided tape on the back of each white oval to hold them in place and fed the printed sheet back through my printer. The sentiment printed perfectly onto the pre-cut ovals.

This is the first time I've printed sentiments onto pre-cut shapes by feeding them through my printer. It's going to give me a lot more versatility now that I've figured out how to do it. Making so many cards, it seems like I just keep doing the same things over and over sometimes! So I'm constantly looking for new ideas and techniques to provide me with some variety.
Sunday, June 26, 2011
Easy Cards Today


Since it's summertime and most of the TV shows are re-runs, I decided to do some "re-run" cards and use up some supplies on hand.
Saturday, June 25, 2011
Ice Cream Bread
I ran across this recipe tonight and decided to post it on here. I haven't tried it yet, but it sounds like something I'd enjoy making and surprising people with! She made hers with Butter Pecan ice cream.
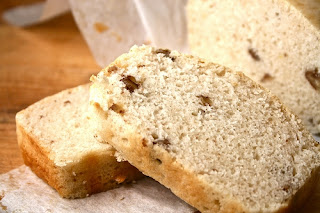
ICE CREAM BREAD
Makes One 8 x 4 loaf
2 Cups Ice Cream, any flavor, softened
1 1/2 cups Self-Rising Flour
Preheat your oven to 350. Spray and flour a 8 x 4 loaf pan, or line it with parchment paper.
In a medium bowl mix the ice cream and flour together until just combined.
Scoop into the loaf and and smooth out.
Bake for about 45 minutes or until a toothpick stuck in the loaf comes out with a few crumbs stuck to it.
Remove from the pan and allow to cool (if you can wait that long)!
For best results..use full fat ice-cream!
Recipe source: 1001 ways to Cook Southern
Friday, June 24, 2011
Sunflower Cards
At least I used my Cricut on these! Elegant Edges provided the base for the stamped images. The sunflowers are clip art.
When I cut clip art images out by hand and don't want any white edges showing around the image, I take a marker that matches the colors in the image, or a black marker if the image outline is black, and trace around the image before I cut it out. That gives you a little "cheat" room around the outside and makes it easier to cut them out.
The stamps I used are from the SU Define Your Life set. they've decided to retire this set so I'm sure glad I got a set before the new catalog comes out!
 The leaves were done with a Martha Stewart punch.

When I cut clip art images out by hand and don't want any white edges showing around the image, I take a marker that matches the colors in the image, or a black marker if the image outline is black, and trace around the image before I cut it out. That gives you a little "cheat" room around the outside and makes it easier to cut them out.
The stamps I used are from the SU Define Your Life set. they've decided to retire this set so I'm sure glad I got a set before the new catalog comes out!


Butterfly Cards
The butterflies on these are from a collection of Tim Holtz stickers that I purchased a few weeks ago. I made a color copy of them and then inked them with TH Broken China Distress Ink using a sponge dauber and cut them out by hand. Doing the copy onto cardstock took away the shiny surface that was on the stickers; that's a look that I didn't want on these cards.
The cardstock I used is also Tim Holtz, it was distressed with Vintage Photo ink. The stamped butterflies are done with the same ink.
Wish you could see these in person, I think they're some of the prettiest cards I've made in some time!


 I love the papers in the Tim Holtz stacks. It's hard for me to use it though--because once I do, it's gone! But I'd seen some cards at And Bear Makes Three in Norman, OK that inspired me to "sacrifice" some of it!


The cardstock I used is also Tim Holtz, it was distressed with Vintage Photo ink. The stamped butterflies are done with the same ink.
Wish you could see these in person, I think they're some of the prettiest cards I've made in some time!


Thursday, June 23, 2011
Hello Kitty Card
This is just a blank card. I used Hello Kitty Greetings for the shape, added some hot fix stars, printed the sentiment with my computer and punched it out with SU punches. The bottom edge of the gingham paper was shaped with Martha Stewart and SU border punches.


Wednesday, June 22, 2011
Growing Green Stamp Set Cards
Dawn Griffith had a card on her SU blog that inspired me to make these. I used SU cardstock, Growing Green stamp, Memento Ink, some hot fix rounds and Promarkers to shade the stamped image.
After doing a couple with plain rectangles, I used a Fiskars corner punch to dress up the corners a little. The image is stamped on a light grey cardstock but it appears white in the photos. It's stamped in black ink and shaded with a light grey Promarker.


After doing a couple with plain rectangles, I used a Fiskars corner punch to dress up the corners a little. The image is stamped on a light grey cardstock but it appears white in the photos. It's stamped in black ink and shaded with a light grey Promarker.


Tuesday, June 21, 2011
Stir-Fry Squash
1 T. Olive Oil
4 cups cubed zucchini and yellow squash
1 medium onion cut into large chunks
Salt and Pepper to taste
Few leaves of fresh Basil
Garlic Powder
Grated Parmesan - Romano cheese
Heat oil in 10" skillet and stir fry squash and onion until almost done.
Add Basil leaves and garlic powder and cook just until squash gets
tender. Sprinkle with cheese to serve.
Monday, June 20, 2011
Another scraplifted card
About every 6 weeks I receive Priority Boxes full of cute cards to include in my Cards for Soldiers shipment. It's fun to look through them and see what ideas the talented Mountain/West time zone card makers have come up with.
Sadly, I do not remember which person sent some cards much like this one to me! I just know it was so cute that I decided to scraplift it! So, my apology to the originator! If you see this and recognize your work, please leave a comment so I can give you credit!

Sadly, I do not remember which person sent some cards much like this one to me! I just know it was so cute that I decided to scraplift it! So, my apology to the originator! If you see this and recognize your work, please leave a comment so I can give you credit!

Love Card

More Photos of Fred's Barbecue Book
Hey, Robin! Hope these are what you wanted to see. If not, let me know. It's just cardstock and lined notebook paper, cut to size and bound with the Bind-it-All. Originally, I did it in the composition book, then realized that some of the pages were falling out. Since I had to take the book apart to put the rings in, I just added the cardstock dividers.


Another coffee cup card
The coffee cup is some free clip art that is printed onto patterned cardstock and shaded with Promarkers. I computer printed the sentiment and used some SU punches for the shapes and the corner cut outs. Pop dotted some buttons on since the card just looked too flat.


Sunday, June 19, 2011
Sending you warm thoughts card

Simple Recipe Pages
I am absolutely in a creative funk! Nothing is inspiring me to make cards and so I whipped out these two recipe pages this afternoon. Now, to get back into my "Ideas" folder and search for some card inspirations!
Chicken Spaghetti
8 oz. cooked chicken
3 cups cooked spaghetti—4 ½ oz. dry
3 oz. Velveeta Light
4 ½ oz. chopped green chilies
1 can Cream of Mushroom soup
½ cup chopped onions
½ cup chopped bell pepper-cooked with spaghetti
Mix Velveeta with soup and chilies and heat.
Add remaining ingredients. Pour into greased
9 x 13 pan, cover and bake until hot
************************************************
POSOLE
Pork
Hominy
Chopped onions
Minced garlic
1 can green chilies
oregano
cumin
canned tomatoes
small can tomato sauce
Brown pork on all sides. Put into large
pot with other ingredients, add some
water and simmer until pork is tender.
Garnish with cilantro and serve with
Tortilla chips
************************************************
SOUTH CAROLINA COBBLER
4 cups sliced, peeled peaches
fresh or frozen, thawed
1 cup sugar, divided
½ tsp. almond extract
1/3 cup butter, melted
¾ cup all purpose flour
2 tsp. baking powder
pinch salt
¾ cup milk
In a bowl, gently toss peaches, ½ cup sugar
and extract. Pour melted butter into 2 qt.
baking dish.
In a bowl, combine flour, baking powder, salt
and remaining sugar; stir in milk until smooth.
Pour evenly over butter, do not stir. Top with
peach mixture.
Bake at 350° for 50-55 minutes or until golden
brown.
 |
| Peaches are from Preserves, background is from Elegant Edges |

Saturday, June 18, 2011
An easier way to unmount wooden stamps
http://www.youtube.com/watch?v=dR_lAkWuD_I&NR=1
This video shows a really simple, fast way to unmount and store your wood block stamps. I had purchased the Aileen's Tack -it Over and Over glue for another project so I had it on hand. No more stamping the image onto the cling mount foam and cutting it out. This was is much neater and you don't wind up smearing Staz-On ink all over your fingers! LOL!
This video shows a really simple, fast way to unmount and store your wood block stamps. I had purchased the Aileen's Tack -it Over and Over glue for another project so I had it on hand. No more stamping the image onto the cling mount foam and cutting it out. This was is much neater and you don't wind up smearing Staz-On ink all over your fingers! LOL!
Dimensional Cherry Card
I just love browsing through Splitcoast Stampers' galleries. Every week there are hundreds of new projects posted on there. This card was based on one posted by "Biggan". On hers, she had used clay to make the cherries as well as the leaf they rest on top of.
The cherries and the grape leaf were cut using the Preserves cartridge. I embossed the grape leaf with the Brocade Cuttlebug folder and used a large dotted folder for the card base. The cherries are pop dotted off the surface of the leaf. I inked the edges of the fruit and added a highlight also.

The cherries and the grape leaf were cut using the Preserves cartridge. I embossed the grape leaf with the Brocade Cuttlebug folder and used a large dotted folder for the card base. The cherries are pop dotted off the surface of the leaf. I inked the edges of the fruit and added a highlight also.

Thursday, June 16, 2011
Fred's Barbecue Book
After I showed Fred the recipe Smashbook I made, he decided he'd like one to put his barbecue recipes in. Here's the one I whipped out for him. It surprised me that he wanted one. The only think he's ever asked me to make with my Expression was a stencil to use to paint on a metal tank!


 All he wanted was the pig and the funny definition on the front and back. I added the tabs so he could keep his recipes separated a little better.


When it's too hot to cook....
When it's too hot to cook it's a great time to sort through and organize recipes you want to try out!
Cooking is one of my hobbies. Buying good cooking magazines such as Taste of Home, Cook's Country, and Cook's Illustrated provides me with a lot of recipes that I want to try. But like any magazine, there's always a lot of things in it that don't interest me at all.
Today I decided to go through the magazines I had stacked in the living room and organize the recipes I want to try so I could put the magazines into the recycle bag and get rid of some clutter.
I took an inexpensive composition book and embellished it, added some tabs that I cut using From My Kitchen, and, like a Smashbook, I started smashing the recipes in sort of helter-skelter. I do not plan to go back and add embellishments to the pages. As I try a recipe, if we like it, I'll re-type it and do a page for my Cricut recipe album.
Here's a hint about doing layers or shadows for letters. I placed my shadow paper on the bottom half of my 12 x 12 mat and the other color on the top half of the mat. Then after I cut the letters out, I removed the top layer and left the shadow on the sticky mat. It makes it super easy to apply the top layer that way. No chasing the cutouts over your work table! My top layer was applied using my Xyron sticker maker so I know they're all stuck down well.
 This hint came from the old Cricut message board and I use it any time I have to layer small pieces.


The title on the book front was done with Plantin Schoolbook. I just used some paper from a cooking themed stack and cut out some words to add.
The book has a few divider tabs just to make it easier to find recipes. Once I try them, if they're not something we like, I can just jot a note beside it or tear the page out of the book.
Since it's almost 100° today it was just too stinkin' hot to do anything outside. Organizing my recipes kept me occupied all afternoon and I do feel like I've accomplished something today!
Cooking is one of my hobbies. Buying good cooking magazines such as Taste of Home, Cook's Country, and Cook's Illustrated provides me with a lot of recipes that I want to try. But like any magazine, there's always a lot of things in it that don't interest me at all.
Today I decided to go through the magazines I had stacked in the living room and organize the recipes I want to try so I could put the magazines into the recycle bag and get rid of some clutter.
I took an inexpensive composition book and embellished it, added some tabs that I cut using From My Kitchen, and, like a Smashbook, I started smashing the recipes in sort of helter-skelter. I do not plan to go back and add embellishments to the pages. As I try a recipe, if we like it, I'll re-type it and do a page for my Cricut recipe album.
Here's a hint about doing layers or shadows for letters. I placed my shadow paper on the bottom half of my 12 x 12 mat and the other color on the top half of the mat. Then after I cut the letters out, I removed the top layer and left the shadow on the sticky mat. It makes it super easy to apply the top layer that way. No chasing the cutouts over your work table! My top layer was applied using my Xyron sticker maker so I know they're all stuck down well.


The title on the book front was done with Plantin Schoolbook. I just used some paper from a cooking themed stack and cut out some words to add.
The book has a few divider tabs just to make it easier to find recipes. Once I try them, if they're not something we like, I can just jot a note beside it or tear the page out of the book.
Since it's almost 100° today it was just too stinkin' hot to do anything outside. Organizing my recipes kept me occupied all afternoon and I do feel like I've accomplished something today!
Wednesday, June 15, 2011
A Totally Cased Card!
Pinkberry posted a card a lot like this one online. I'm pretty sure it was on Splitcoast stampers. Making simple cards is what I like to do and this one sure fits that description! To me, it could be a birthday card, a thank you card or just a thinking of you card since I left it blank inside.

Thanks, Pinkberry, for sharing your idea!

Thanks, Pinkberry, for sharing your idea!
Mosaic Card
Paper with large designs is difficult for me to use on an A2 sized card. So, I decided to cut this one into one inch squares and turn it into a mosaic design. It sort of resembles a view out a window and is very summery.


Father's Day and Masculine Cards
Had some requests for card ideas that would be suitable for Father's Day or men in general. Here's photos of the cards I've done in the past. Hope they inspire someone!


Subscribe to:
Posts (Atom)