Sunday, June 30, 2013

Howdy! Card

After having Cooper last week, it's taken me a couple of days to get my housework caught up and back into making some cards for Operation Write Home.  We had Cooper for portions of two weeks during the month of June so it's no wonder my box of cards isn't full and ready to ship!  Love every minute of having the little guy with us.  Cards can wait, babies can't.  They grow up too fast.  It's hard for me to believe that he's going to be two in just a few weeks!

I used Color Box ink to stamp the pocket image and Tuxedo Black Momento ink for the stitching.  Using my Stamp-a-ma-jig made it super easy to line the stitches up properly on the pocket image.

The bandana is clip art.  I resized it and trimmed it by hand so it would look like it's hanging over the edge of the pocket.  The sentiment was printed on my computer.


Wednesday, June 26, 2013

Sunny Day Card

I saw this card on Stamping411.  It was done by a featured stamper named Lynn Mangan.  The retired Tart and Tangy stamp set from Stampin' Up is one of my favorite sets.

The white background was embossed with a Cuttlbug folder.  The sentiment is from Stampin' Up.  It's a quick card perfect for summer.


Sunday, June 23, 2013

Roses Card

I designed this card today to use the sentiment I found.  The paper is from K & Company.  I used images from a couple of Cricut cartridges on the front and added a punched border and some pen dots.


Friday, June 21, 2013

Popping By Card

Inspired by a card seen online, I used an image from the cartridge County Fair and printed the sentiment.  Then I added some pen work and a couple of candies for some detail.

Almost Eleanor Card

One of my favorite movies is "Gone in Sixty Seconds".  In the movie, there is a marvelous car chase scene involving a 1967 Mustang Fastback called Eleanor.  I'm not 100% sure this is a 1967 model but this is my dream car.

My card is based on one I saw in Just Cards magazine.

I put a diamond plate design on silver cardstock with a Cuttlebug folder and accented the black and white card with bright orange mats and a photo square.  The Mustang image is clip art.


Wednesday, June 19, 2013

So Sweet Card

My friend, Shirley, made the SVG file that I used on this card.  I like it well enough that I decided to make an even dozen for Operation Write Home.  I didn't stop to realize that I'd have 168 pieces to assemble for the dozen to be completed.  LOL!


Monday, June 17, 2013

More Versions of the Library Pocket Card

 Pretty much the same layout of the original card I posted today.  Just used some different color combinations.


Library Pocket Card

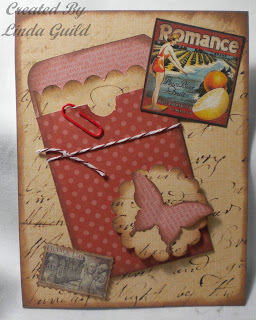
The library pocket is from the Fabulous Finds cartridge, cut on my Cameo.  I used some of the Stampin' Up papers sent to me by Robin Goens.  The edges were inked with Chestnut Brown.  The butterfly and scalloped circle were done with Stampin' Up punches.  Then I added a Graphic 45 image and a stamp cut out from a 12 x 12" sheet of paper.  The paper clip was tinted with a Bic marker to coordinate with the other elements.


Saturday, June 15, 2013

'Sup? Card

The sentiment was printed on my computer.  The ball cap is from 3 Birds on Parade cartridge.
I used some of the solid cardstock that Robin Goens sent me for the layers.

Monday, June 10, 2013

Another Wine Themed Cutting Board

The file for this was shared on a Facebook Silhouette page.  It was even the perfect size for the glass cutting board from WalMart.  I did some minor modifications on the design by eliminating some of the tiny elements on the corkscrews.

At wine group Saturday night, I had a pen and paper game for the ladies to play.  I gave this as one of the prizes for playing the game.  

Friday, June 7, 2013

To The Moon Card

The stars and moon printed paper I found at Scraptopia last night makes a perfect background for the space ship.

Thursday, June 6, 2013

Rooster Card

This morning on Pinterest I saw a card very much like this that was made with a retired Stampin' Up stamp set.  Since I'm not willing to pay a premium price for the stamps on Ebay, I searched around and found a clip art rooster to use instead.

The chicken wire embossing is a Cuttlebug folder.  I added some Tim Holtz distress ink to age the paper.

The longer I looked at this when it was finished, the less I liked the blank area around the rooster so I added some corner stamps to break up the space.

Wednesday, June 5, 2013

Beach Booty Card

 I cut the circle in the card front and backed it with some blue patterned paper to simulate water.  The woman is a clip art image that I cut out and pop dotted.

Used some more of the huge amount of twine I have on hand.  I swear, that stuff's multiplying in the dark!
This is the inside sentiment that I printed in Hallmark card software.

The front of the card is a total scraplift of one seen on Pinterest.

Cuppa Love Card

Inspired by a card seen on Pinterest, and my quest to use up a stack of printed paper, this is the card I came up with today.

The edges of the card base were inked.  Using the Wild Card cartridge and my Expression I cut a 3" scalloped circle--you can tell it was cut with a Cricut because the scallops aren't uniform.  That's the mark of a Cricut--whonky scallops!

The green circle was done with a 2 1/2" EK Success punch.  The coffee mug is a clip art shape, colored with Promarkers and pop dotted for dimension.  I added a small punched heart onto the side of the mug.

The sentiment was printed on my computer and the end notched with one corner of a square punch.  I added some flowers with Pearl Pen dots for centers.


Tuesday, June 4, 2013

The dressing recipe I forgot to post!

I could have sworn that I'd posted this recipe on here a long time ago but when I searched for it, it was nowhere to be found!

This recipe came from our all time favorite barbeque restaurant.  We miss eating Ben's great ribs and chopped beef!

If you like ranch dressing, you'll enjoy this.

Ben’s Salad Dressing

1 cup buttermilk
3 ½ oz. Oil   (1/4 cup or less)
1 pint Mayonnaise
1 T. garlic powder
¼ tsp. Dry mustard
¼ tsp. Salt
¼ tsp. Sugar   (I omit the sugar)
juice of ½ lemon

Mix well with mixer or whisk and chill.


Monday, June 3, 2013

Missing "U" Card

I really like the way this turned out.  The milk carton is clip art I found online. .I did some modifications to it in Hallmark card software and added the "U" cut from the Cricut Art Philosophy cartridge.  I cut it out by hand and added a red shadow.  Then, I pop dotted it for dimension.

The polka dotted red candies in the corners  and the pen work help to define the space.  Thanks again to Enfys Cashmore for sending me the candies.

!  

Snail Mail Card

I dusted off my Expression and used the Sentimental cartridge to cut the snail and sentiment.


Sunday, June 2, 2013

Recipe Book Pages

 This page has Cheesy Onion Casserole and Pizza Grilled Cheese recipes.  I used some of the kitchen themed stickers I found at Scraptopia and photos from the internet where I found the recipes.
This recipe for Crisp Cucumber Salsa was one I found on Pinterest.  It just sounded so unusual that I had to give it a try. Now I know that I cannot make it unless I plan not to eat anything else!  I've made it several times and wind up eating almost the whole thing.


Cheesy Onion Casserole

    2-3 Tbs butter or margerine
    3 large sweet onions or 4 medium white or yellow onions
    2 c. shredded swiss cheese (8 oz.)
    1 can cream of chicken soup, undiluted**
    2/3 c. milk
    1 tsp. soy sauce
    8 or so slices of French bread

Melt butter in a saute pan over medium heat, and add onions.
Saute onions until clear, a little brown is ok. In a shallow 2 qt.
casserole pan, layer onions, 2/3 of cheese and pepper to taste.

In a sauce pan, heat soup, milk, and soy sauce, stirring to blend.
Pour soup mixture in a casserole and stir gently to mix. Top with
 bread slices. Bake at 350 uncovered for 15 minutes. After
15 minutes, top of bread should be nice and toasted.

Push bread slices under the sauce and top with the remaining cheese.

Bake for 15 more minutes and you are done!


*******************************************************
Pizza Grilled Cheese

   4 sliced bread
    butter
    4 mozzarella, sliced
    pepperoni (cut in half or mini)
    italian seasoning or basil
    parmesan cheese (opt)
    pizza sauce (for dipping)

Butter each piece of bread on one side. When skillet
is hot place a piece of bread butter side down on the
skillet then add one slice of cheese and small shake
of Italian seasoning or basil (add a small shake of
parmesan cheese here too if desired). Top with a
desired amount of pepperonis  Add another slice of
mozzarella and top with slice bread butter side up.
Repeat with second sandwich. When bottom slice
is golden brown then flip over carefully. Once both
sides are brown remove from pan cut and serve with
pizza sauce if desired.
*********************************************     
Crisp Cucumber Salsa

Yield 2-1/2 cups

2 cups finely chopped seeded peeled cucumber
1/2 cup finely chopped seeded tomato
1/4 cup chopped red onion
2 Tbsp minced fresh parsley
1 jalepeno pepper, seeded and chopped
4-1/2 tsp minced fresh cilantro
1 garlic clove, minced or pressed
1/4 c reduced-fat sour cream
1-1/2 tsp lemon juice
1-1/2 tsp lime juice
1/4 tsp ground cumin
1/4 tsp seasoned salt
Tortilla chips

In a small bowl, combine the first seven ingredients. In another bowl, combine the sour cream, lemon juice, lime juice, cumin and seasoned salt. Pour over cucumber mixture and toss gently to coat. Serve immediately with chips


Saturday, June 1, 2013

Seashore Card

The kraft background is embossed with a honeycomb folder.  I stamped each image in a different color of Memento Ink, inked the edges with Chestnut Brown and mounted them on a red mat.  Then I stamped a small round image and tucked a short length of blue ribbon underneath it.

Inspired by a card seen on Pinterest.

Simple Card Saturday

Another card I made today to utilize some of the floral papers I have on hand.  It must be Simple Card Saturday!


Blue Flower Card

My mission this week is to use as many sheets of floral paper as possible.  I have a huge stack of floral prints that I want to use and make room for some new paper!