Wednesday, June 15, 2011

If you can't find Smashbook supplies in your area

Smashbook supplies still haven't made it into the Michael's or Hobby Lobby in our area but I found this cool spiral book of images by Tim Holtz that are going to be perfect to add to my Smashbook!

There are nine, 12.75 x 6"  pages of vintage/shabby stickers, a total of 372 stickers and it was only $4.99.  Of course, I used a 50% off coupon to buy it so it was only $2.50!  I'm not a big fan of stickers but Tim Holtz does such great vintage things that I had to have these.


 Love these butterflies and the postcard images!
 Just the other day I was looking for a map to use on a card front!
 In the lower left corner there's a report card from an Oklahoma City school from the early 1900's and a perfect attendance award.
I'm going to hate to use these buttons because they'll be gone...but they're going to work great with some sewing themed stamps I have.
 Alphabet stickers are something I've never used!  I may just scatter them throughout the pages of my Smashbook.
 I'm so glad I found this pad of stickers so that I'll have some good images to include in my Smashbook. 

Sunday, June 12, 2011

Butterflies and Buttons Card

This card was inspired by one I saw online and saved a jpg image of in my Ideas folder.  There's no watermark on the photo so the only credit I can give for the inspiration is for "cuttlebugstamps3"---I truly do not know where I saw the card!

Because I make a large quantity of cards, I try to shop for bargains for my supplies.  Some time ago, I found these sheets of wall stickers in our Dollar Tree store and picked up several sheets.  The colors were nice and I figured the butterfly images would work well on a variety of cards.  As you can see, I've used quite a few and hated to run out since they can't be replaced.


Sometimes I amaze myself!  DUH!  I have a color copier!  So I put the sticker sheet on the copy bed and just shot several pages of copies.  They were very simple to cut out with Cutterbee scissors.  Some were copied onto photo paper and some on white cardstock.  I think the colors show up better on the photo paper. 


I used A Child's Year to cut the scarlet colored rectangles and a Martha Stewart punch for the buttons.  The sentiment is from a Paper Studio stamp set and the dots were done with a SU marker.  The colors of cardstock I used were a deep ruby red and cream.  They didn't photograph well under my Ott light.  The ink I used for the sentiment matches the ruby cardstock and it looks pink in the photo!


This is the first card I've designed in over a week.  Generally, I work every day in my craft room but have just sort of lost my mojo these past few days.   Most of my time spent in my craft room has been playing A Garden of Time on Facebook!  So, I think my "garden" is going to have to be left unattended for a while so I can be certain I have the 150 cards finished that I pledged to Cards for Soldiers! 

Thursday, June 9, 2011

I Love Shoes

When I was 15, and got my first job, every pay day I'd go to the shoe store and buy myself a new pair of shoes.  Not quite as bad as Imelda Marcos, but pretty close.  When Fred and I got married and moved into our first apartment, he was astounded that I owned at least 50 pairs of shoes.  He probably owned four.

Not only did I have shoes, I had handbags that matched.  They took up a lot of closet space and over the years I've definitely stopped buying what I'd call "dress" shoes because I have no need for them.  Nowadays, my New Balance shoes work for me just fine.  It's one of the things I truly enjoy about being retired.  No more getting dressed to go to work....my jean and tee shirts work just fine.

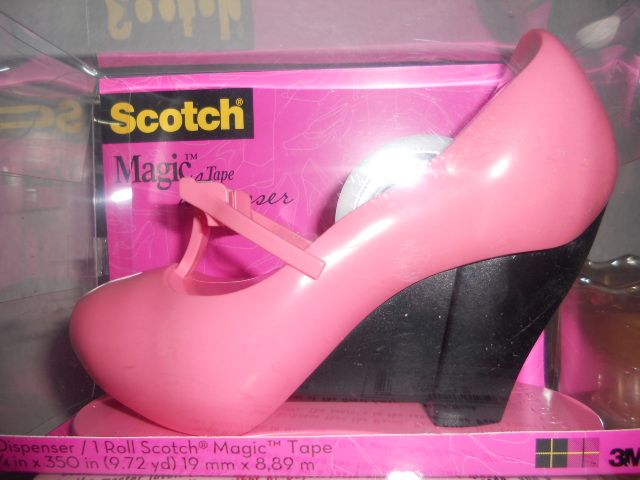
Several years ago I began to collect shoe figurines so when my "Short Sister", neighbor, Leonna saw this at Staples she grabbed it for my birthday gift.  I've never seen these before and just love it!  It's definitely got a spot on my desk beside my scrap counter!

Yes, it's a tape dispenser!  How cute is that!
I told Leonna that it looks like a Cinderalla or Snow White shoe.

Monday, June 6, 2011

Summer is on us!

Warm, well let's face it, HOT, weather has come to Oklahoma.  It's been in the high 90's most of this week.  And I've had quite a bit of stuff to tend to outside since Fred can't get around on his own yet.  It's been almost impossible for me to carve out enough time to do any cards or crafting!

I've been preparing for some company too.  Our good, long time friends, John and Jackie came in from Massachusetts for a couple of days.  We certainly enjoy seeing them and getting the chance to catch up on the changes in our lives as well as our children.

Time gets away from me these days!  Last night we were talking with John and Jackie about things that happened thirty years ago!  Back then we were all running in circles raising our kids and trying to stay active in several charity and community organizations.  Now, as of this Wednesday, all four of us are Social Security age!  We all commented about "where did the time go?".  It just doesn't seem possible that it was so long ago that my son, who had a driver's license, agreed to pick up their daughter each morning and take her to early band practice.

My son now has a 17 year old daughter and a new son to be born next month.  Their daughter has three children from ages 12 to 8! 

I guess my point in this rambling post is that no matter how many years go by, friends that are true friends can see you every day or move across country and each time you get together it's as if the time and distance don't exist!

Tuesday, May 31, 2011

I was going to use my Cricut...

Kudos to Janelle Larson for posting a photo of a card similar to this one online.  It was just so cute I had to scraplift her concept!

Shirley, aka Okieladybug, made a cut file for a crab that matches my SU Mr. Crabby stamp set.  I was going to use my Cricut to cut out the crabs for this card and realized they'd be too big.  Instead, I found a Dustin Pike digi image and used it instead.

The red crabs are printed in color on card stock.  Then I printed out several without color and used my Promarkers to make the blue crab and pop dotted it over the red one.    The sentiment was printed in my card making software, I added some inking and some twine.

Monday, May 30, 2011

My Heart Sings


The music printed paper is a true black but looks more charcoal grey in the photo.  I used SU punches for the heart, bird, tiny hearts and the shape for the sentiment.

Sunday, May 29, 2011

Another Cat Card

After I made the photo, I realized that I hadn't colored the mouse in the water can! 

Saturday, May 28, 2011

Fat Cat Card

These little fat cat images are cute and only take a few seconds to color with Promarkers.  I adhered a narrow strip of the red polka dot paper on the inside edge, added some twine and a couple of flowers punched with a SU Bitty Punch.

Inspired by susiespotless.

Wednesday, May 25, 2011

Big Buckle Card

Splitcoast Stampers has a tutorial on how to make this card here:
http://www.splitcoaststampers.com/resources/tutorials/big_buckle_card/

It uses a SU word window punch but you could easily cut an opening using your Cricut.

  
card front with "buckle" closed

card open so you can see the strap

just tuck the strap into the opening

Smashbook Page

This is my favorite page in my Smashbook, so far.  It's also the only one that I have completely embellished.

The background is punched pages from an old encyclopedia that I distressed with Tim Holtz ink.  I used some scalloped circles, circles and pleated some long strips with torn edges.

Graphic 45 paper is a favorite of mine.  I love the vintage images but have difficulty coming up with really good ideas to use them on my cards.  The image on this page is too large for an A2 card so now it won't go to waste. The flower on the lower corner is from a package that I picked up at the Dollar Tree a couple of years ago.

When I got to this point, and took a photo, I decided to add some other items to the page.


There just seemed to be too many blank spots on the page so I tucked in some leaves and added a bow.

I'm going to have to study it for a while and see if I can come up with a better flower to put on the page.  I'm not sure I like the striped/checked one.  But, I'm trying to "work outside the box" and learn to put multiple things on the pages in layers.  It's kind of hard for me to not make everything symmetrical!

EDITED*******

My smashbook is laying on my work table with it opened up to this page.  The longer I looked at it with the leaves and the bow, the less I liked it.  I ripped off the bow and flower as well as the leaves and now it looks like this:


Next time I'm just going to smash some embellishments, I need to lay them out and study them for a while before I glue them all down!  LOL!

Tuesday, May 24, 2011

Red, White and Blue Cards

The current challenge for Cards for Soldiers is to use red, white and blue on our cards.  The paper is some I found at Hobby Lobby, the stickers were in my sticker stash and I added some border punched pieces and some Stickles (which I managed to stick my fingers into and smear at least 3 times).


These cards are part of my effort to use up the supplies I have on hand.  There is still a Jetmax drawer full of stickers that I need to use, and I've already gone through and donated a lot that I thought I'd never use.
I'm also trying to use up the regular weight paper that's on hand and go to more 12 x 12 cardstock weight.  Right now I have a ton of light weight paper so I'll probably do a lot more simple cards like these to get it used up.

Sunday, May 22, 2011

Filling up my Smashbook

After going through 3 desk drawers, I found quite a few things to put into my Smashbook.  There's still no embellishments on or in it though!  I love the shabby look of the ones I've seen online but just lack the artistic talent to do mine that way.

So far all I have is some cards, photos, plane tickets and some letters inside.  Tomorrow afternoon I'll look around some more and see what other treasures I can find to put inside.

The pages are 5 1/2 x 8 1/2 and now I'm sort of wishing I'd done mine larger than that to accommodate the programs from our granddaughter's dance and music recitals.

I highly suggest that you put several of the pocket pages in yours if you decide to make one.  I have some old letters from my mother and brother that were hard to put into mine so I had to use the pocket pages.  Now I'm sure I'll find other things that I don't want to tape down and need more pockets! 

Composition from 1984

When my son was in high school, I went back to college.  This composition is one I wrote for a writer's group that I belonged to.  Tonight, while looking through drawers to find items to put into my Smashbook, I ran across it and decided to post it on here.  I don't remember what the assignment was, but I do remember sitting in our living room looking at the Mission rocker and feeling that I had to write about it.

My husband's grandfather, who I never met, first sat in the old oak rocker that waits silently resting in the corner of my living room.

This old rocker with the broken springs and the tell-tale squeak when you rock has traveled hundreds of miles back and forth singing babies to sleep with its own lullaby and comforting old people as they took their ease, perhaps sitting near a sun filled window.

It is a sturdy chair, not soft and yielding, but sensible in design, made to soothe a fretful baby and last until his old age.

Although the cushion has been reupholstered, worn thin by the many people who have used the rocker, the wood itself glows with the patina only old, good, wood possesses.  It is almost as if the wood had stored part of the radiance from the babies' smiles and is barely able to contain it.


When my son was born, my mother-in-law, Thelma, gave me the rocker.  It had been given to her by her mother-in-law when she had her first child.  It must be a wise old chair by now because Thelma rocked seven babies in it.  It seems to know just the right creaks and squeaks to lull a baby into a peaceful sleep.


My son, Gene, and I have spent more hours together in this chair rocking, eating, playing and reading, than we have spent doing anything else.  It has wide arms which are perfect for resting your elbows on while reading a story book to a child and rockers sturdy enough for an energetic boy to play see-saw on.


It has now become an all purpose chair for our family while we are in transition.  One wide arm is now used to hold a cold drink for my son while he sits with one leg thrown over the other.  The creaks and squeaks unwind my husband after a hard day's work and sometimes they put him to sleep too as he sits with his feet propped up reading the paper.


We have no babies, for now, to cuddle and rock to sleep or any old people to rest in our chair.  But it sits ready, waiting for our old age and our next generation and it gives me the feeling that it will always be there.


A lot of changes have occurred since this was written in 1984.  Of course my son is grown and I spent many, many hours rocking his daughter in this chair.  My husband and I are now the "old people" who use the chair.  Our newest grandchild will be born in two months and the chair is ready to be put into service again to rock another baby.

Simple Card Sunday

The image is from a set of Studio G stamps I purchased right after I got my Cricut three years ago.

Today I just felt like doing something really simple!  So, I stamped off a few images and colored them with my Promarkers.

Saturday, May 21, 2011

Smashbook

Greenbean did a post on the Cricut Circle message board about Smashbooks.  I'd never even heard of them until I read her post.  And, like Greenbean, I'm NOT a scrapbooker.  After watching this video I decided to make my own Smashbook to hold all the cards that Fred's received while he's recuperating.

http://www.youtube.com/watch?v=U9oV9akW-fo   ---- link to the instructional video

 View of all the pages.  I have divider pages--no tabs on those yet!--colored copy paper pages, graph paper, lined paper, double sided cardstock and the pages that she gives a link to download and print inside.


I printed her pages on white cardstock and just cut them to size.

 One of my favorite patterns is CHERRIES! So that's what I used for the front cover.
 Obviously, front and back covers.
 This is one of the pages that you can print using the link provided in the Youtube video.  This one says "notes and quotes".
I inserted these sheets of lined paper just behind the page shown above.  If you ever see my status updates on Facebook, you know that I collect funny quotes and sayings.  Now, I have a cool place to keep them written down.
 This is another of the pages I printed and just added a library pocket onto.
 Another pocket on a sheet of double sided paper that Okie and I found at Tuesday Morning a while back.
This is a sheet of Heidi Grace cardstock that I made one of the pocket pages using the instructions in the video.

So, mine's pretty much a Plain Jane for now.  I'd love to "trash" it up like the ones I've seen online but truly don't know where to start!  LOL!  But, it will be handy to jot things down in and tuck things into that I want to keep!

Wednesday, May 18, 2011

Just the cutest card, ever!

Everyone probably knows this by now, but, my husband fell off a ladder while erecting a 40 x 60' tent for a local bluegrass festival.  He fractured his right hip and foot and is at home recuperating and doing really well.

Shirley, aka Okieladybug, put a post on the Cricut message board and the Old Cricut Community page on Facebook to make people aware of this and we've received several beautiful cards from the people on there. Fred and I both appreciate the gesture!

In today's mail, there was a Priority Mail envelope which I assumed had some cards inside that I would include in my next shipment out for Cards for Soldiers.  Imagine how surprised I was when I opened it up and found several sheets of stamped images for me to color, a sweet note to me and this wonderful card for Fred.

Linda Bonlin, hugabug on the MB, sent this card.  I can only imagine how many hours it took to design and make it!  We both absolutely cracked up when we saw it.


I wish you could see it in person!  There is so much detail on it and it fits our situation just perfectly!  Notice the banjo, guitar and fiddle!  The little signpost is so cute too!  I'm sure the expression on the woman's face is just about what mine would have been, had I been there when he fell, too.

The red ribbon on the right side looked like a cute embellishment, until I gently tugged on it......


It's a SLIDER!  The woman moves across the card with her net extended, ready to catch the guy!  How cute is that? 

Thanks again, Linda.  This will be a great keepsake for us!

House Cleaning Poem

 My friend, Carol Neal, sent this to me this morning.  Pretty much explains my housework routine!


*The Cleaning Poem*

*I asked the Lord to tell me
Why my house is such a mess.
He asked if I'd been 'computering',
And I had to answer 'yes.'*

*He told me to get off my fanny,
And tidy up the house.
And so I started cleaning up...
The smudges off my mouse.*

*I wiped and shined the topside.
That really did the trick...
I was just admiring my good work.*
*I didn't mean to 'click.'*

*But click, I did, and oops - I found
A real absorbing site
That I got SO way into it...
I was into it all night.

Nothing's changed except my mouse.
It's very, very shiny.
I guess my house will stay a mess...
While I sit here on my hiney.*

Tuesday, May 17, 2011

Winning Sentiment

This is the sentiment that Melissa Allore sent to me to be used with this stamp.  I think it's absolutely perfect for the image!

Things got a little hectic around here right after I received the sentiment.  It totally slipped my mind until I found the stamped images on the worktable this afternoon.  This is what I came up with:


Since no one has worn hosiery like this since the 50's I wanted to do something with a vintage look.  The paper came in a stack of vintage prints.  I added some Prima flowers with Liquid Pearl centers--which are pink but look yellow in the photo.

Thanks again, Melissa!  Hope you're enjoying using the twine!

Just a Note card

 Printed the sentiment with my computer, used a SU punch for the hearts, ran all the embellishments through the Cuttlebug and inked the hearts.  Tied on some baker's twine.  I used shaped scissors on the black and just ripped the tan paper by hand.
This is the original card.  I'm concerned that the buttons I used may be too thick for post office machinery so I may have to keep these for my personal use instead of sending them to Cards for Soldiers.

It was inspired by a card I saw online by "Biggan".

Color Charts

I use Hallmark card making software to print my sentiments and clip art images for my cards.  It seemed like every time I wanted to print some text in a color to coordinate with the paper I was using, it would take me multiple tries to get the right shade.  So, today, I finally made myself a chart of the default colors available in the software.   I can customize them too if they're not dark enough, etc.


  Right after purchasing my Promarkers, I made this chart to help me select colors.  I just set up a page in Excel and colored the boxes beside each name.  I did one for my Stampin' Up markers too.


Being able to see what the colors of the printer ink look like, I was able to get a pretty close match to some Martha Stewart ink that I used to stamp the flowers on this simple card.  The stamps are SU, God's Beauty set and I used Old Olive cardstock.

Dawn Griffith had a card like this on her blog this morning.  It's a good example of how a simple design can be used for a variety of cards by just changing the sentiment you choose.