When I saw this tip online a few years ago, it was a real "ah-ha!" moment for me! I tie lousy bows and wasted so much ribbon trying to get a bow placed where I wanted on a card front until I saw this tip.
First, just cut a length of ribbon longer than the width of the area you want to apply it onto. You'll need the extra length to make the knot and have enough left over to wrap to the back of the cardstock to secure the ends. Also cut a short piece--this will become the "bow".
Make a loop in the longer piece about where you
want the bow to be.

 Put the short piece of ribbon through the loop. I cut one from a different color ribbon so you could see it easier.
 Tighten the loop and "voila!" you have a bow.
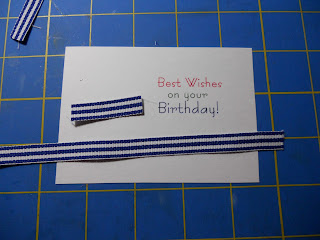
 Here's one on the birthday card I made today.
The sentiment is computer generated; the candles are 5/8" strips I cut by hand; the flame was cut using Splish Splash cartridge and inked.
First, just cut a length of ribbon longer than the width of the area you want to apply it onto. You'll need the extra length to make the knot and have enough left over to wrap to the back of the cardstock to secure the ends. Also cut a short piece--this will become the "bow".

Make a loop in the longer piece about where you
want the bow to be.


The sentiment is computer generated; the candles are 5/8" strips I cut by hand; the flame was cut using Splish Splash cartridge and inked.
5 comments:
omgosh...what a great idea. i'm terrible with bows....thanks.
Great tip! And your card is really cute! Thanks for sharing.
One more thing...
You must have used the raindrop cut from Splish Splash for the flame---clever! Another idea I would never have thought of myself!
How cute! Love this idea. I tie terrible bows also!
great idea!
Post a Comment