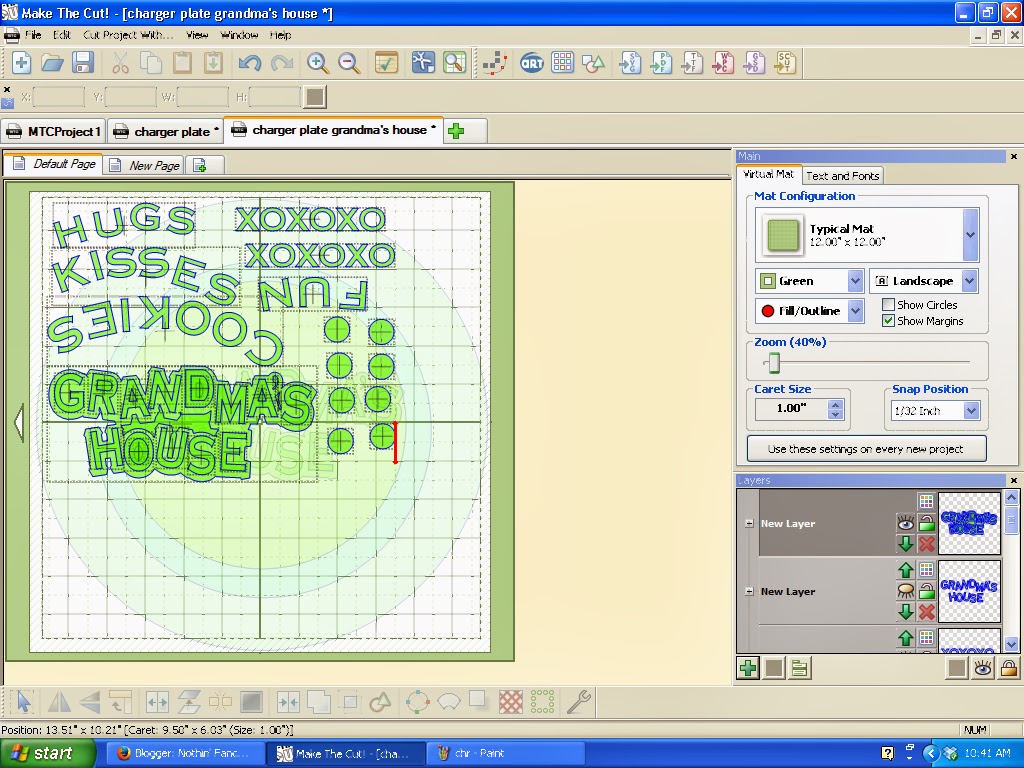
After I posted the first few charger plates I'd made, I started getting questions on how I sized my designs for the center and how I was able to space the shapes on the outer edge.
The creator of Make The Cut software does a weekly webinar where he answers questions asked on the MTC forum. Last year, one of the big questions was "how do I curve text to fit a circle". Within his discussion and demonstration in the webinar was the suggestion to create a template for a charger plate. That way you can see exactly what size your images need to be cut and where to place them on the plate.
I use this template:
 I made three different colored circles. One for the outer edge, one for the ridge around the center space and then one for the center.
Once I get all the shapes where I want them on the template, I'm ready to cut.
 Doing a cut preview means I can zoom in and be certain all the shapes will cut the way I want. Sometimes I'll overlook welding letters in a script font and have tiny cuts that I don't want. By doing the preview I have a chance to make any changes I need.

The next step is to group all the shapes closer together on the mat and get ready to cut them. I cut all these from a single color so I just put them close together to save vinyl. Once I've finished cutting, I close the file without saving it and reopen it to see how it looked originally so I know where to place the shapes.
 This is how I place my cut outs on the plates. I lay a ruler across the center of the plate. Then place a second one perpendicularly to the first. I mark four places on the outer edge of the plate with blue painter's tape for reference.
*** I am known as the "Glue Booger Queen" to my crafting friends. You can see why by looking at my rulers in the photo. There's adhesive smeared all over them!***

I placed a piece of white cardstock underneath the rulers so you can see that I lined up the vertical one on the 6 1/2" line of the horizontal ruler. My plates are 13" in diameter so that's the middle.
 Once you get these four points marked, it's simple to place markers in between for spacing your cuts on the outside edge of the plate.
This may not be the most efficient way of doing the plates, but it's a method that works for me.
The creator of Make The Cut software does a weekly webinar where he answers questions asked on the MTC forum. Last year, one of the big questions was "how do I curve text to fit a circle". Within his discussion and demonstration in the webinar was the suggestion to create a template for a charger plate. That way you can see exactly what size your images need to be cut and where to place them on the plate.
I use this template:

Once I get all the shapes where I want them on the template, I'm ready to cut.


The next step is to group all the shapes closer together on the mat and get ready to cut them. I cut all these from a single color so I just put them close together to save vinyl. Once I've finished cutting, I close the file without saving it and reopen it to see how it looked originally so I know where to place the shapes.
*** I am known as the "Glue Booger Queen" to my crafting friends. You can see why by looking at my rulers in the photo. There's adhesive smeared all over them!***

I placed a piece of white cardstock underneath the rulers so you can see that I lined up the vertical one on the 6 1/2" line of the horizontal ruler. My plates are 13" in diameter so that's the middle.

This may not be the most efficient way of doing the plates, but it's a method that works for me.
3 comments:
the visual helps. thanks linda. since i bought 2 diff size chargers, i'm making a circle the same size on my mat then in my software, find the center and mark the top/bottom/sides by counting clicks. i 'save' that, then like you group them together to save vinyl while cutting and go back to the 'saved' image for reference.
i'm usually in the ballpart when eyeballing them onto the plates. and if i'm lucky, no-one will notice 'too much' if i'm off just a bit.
of course, my 15yr old g daughter points out something crooked or off center every time. she's so nice!
Thank You- I had the template & am also obsessed with everything being lined up. A tip for you- I have a ruler that starts with 0 in the middle- then measures out on both sides. Its So easy to find the middle that way. Maybe in quilting supplies?
Post a Comment