Showing posts with label charger plate. Show all posts

Saturday, October 19, 2013

Placing Designs On Charger Plates

After I posted the first few charger plates I'd made, I started getting questions on how I sized my designs for the center and how I was able to space the shapes on the outer edge.

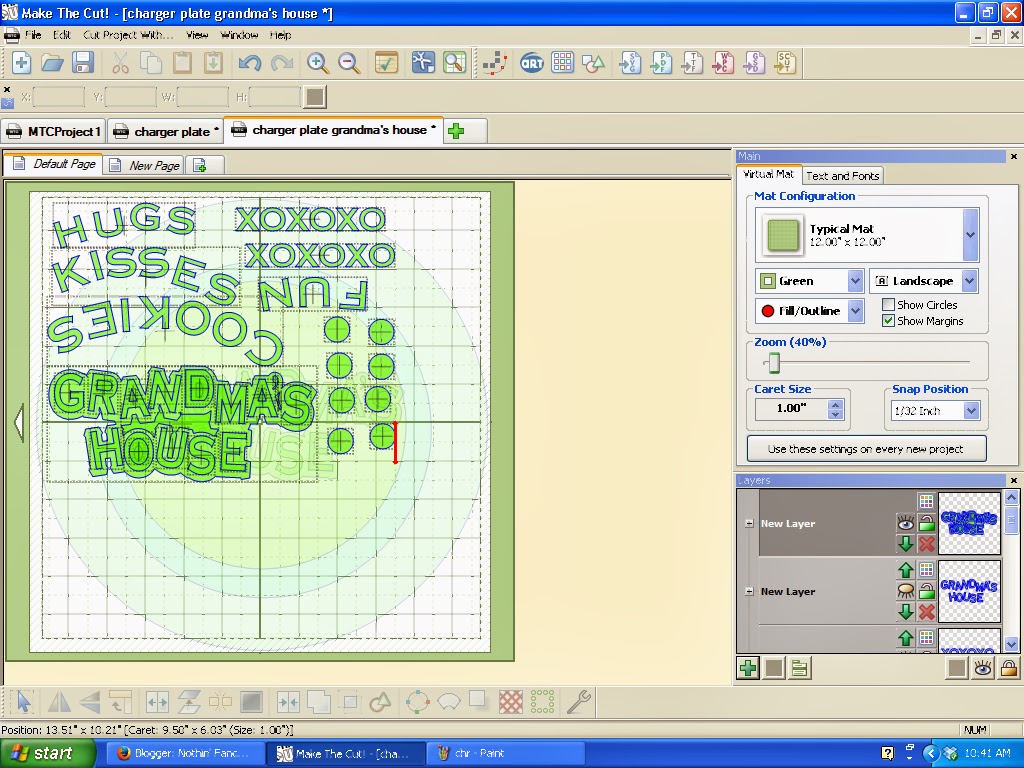
The creator of Make The Cut software does a weekly webinar where he answers questions asked on the MTC forum.  Last year, one of the big questions was "how do I curve text to fit a circle".  Within his discussion and demonstration in the webinar was the suggestion to create a template for a charger plate.  That way you can see exactly what size your images need to be cut and where to place them on the plate.

I use this template:

I made three different colored circles.  One for the outer edge, one for the ridge around the center space and then one for the center.

Once I get all the shapes where I want them on the template, I'm ready to cut.

Doing a cut preview means I can zoom in and be certain all the shapes will cut the way I want.  Sometimes I'll overlook welding letters in a script font and have tiny cuts that I don't want. By doing the preview I have a chance to make any changes I need.


The next step is to group all the shapes closer together on the mat and get ready to cut them.  I cut all these from a single color so I just put them close together to save vinyl.  Once I've finished cutting, I close the file without saving it and reopen it to see how it looked originally so I know where to place the shapes.
This is how I place my cut outs on the plates.  I lay a ruler across the center of the plate.  Then place a second one perpendicularly to the first.  I mark four places on the outer edge of the plate with blue painter's tape for reference.

*** I am known as the "Glue Booger Queen" to my crafting friends.  You can see why by looking at my rulers in the photo.  There's adhesive smeared all over them!***


I placed a piece of white cardstock underneath the rulers so you can see that I lined up the vertical one on the 6 1/2" line of the horizontal ruler.  My plates are 13" in diameter so that's the middle.

Once you get these four points marked, it's simple to place markers in between for spacing your cuts on the outside edge of the plate.

This may not be the most efficient way of doing the plates, but it's a method that works for me. 

Friday, October 18, 2013

Grandma's House Charger Plate

Cornerstone is the font I chose for this charger plate.  I love how easy it is in Make The Cut to create a shadow layer for text!  So much easier than struggling like I used to while using a Cricut and Design Studio software!

This is a design that I made myself...I know, don't faint!  I didn't copy it from something I saw online!


Wednesday, October 16, 2013

Green and Gold Charger Plate

Lobster 1.4 font was used for the center sentiment.  The wheat is from the Silhouette store, file #50134. I modified it slightly in my software so it would fit well on the outer border of the plate.

Snow Tree Charger Plate

This morning I saw another charger plate that had the snow tree in the center on it.  It's from the Silhouette store.  It cuts cleanly, but getting the tiny swirled branched onto the transfer tape and then onto the plate was a little tricky.  Even after washing the plates sometimes the vinyl just doesn't want to stick down.

I added a couple of extra birds to the design and then dotted the swirls on the outer rim with red Stickles.  We're not supposed to use Stickles on our Operation Write Home cards any longer so I need to use them up!


Snowman Charger Plate

I wish I could remember where I got the snowman and the words used on this plate.  It may have been a file that was shared on the Make The Cut forum last year.  The original design had more intricate snowflakes on it; I changed them to a simpler one that would cut faster and be easier to weed.

***Edited:  Thanks to Lillie Charleston, I now know that the file was placed on the MTC board last year by Brianna.**** 

Danita Kinney messaged me and gave me the source for the original snowman   http://oodlesofdoodles26.blogspot.com/2011_12_01_archive.html


Monday, October 14, 2013

Celebrate The Season Charger

Gold metallic vinyl was used to cut these shapes from the Silhouette store.


Merry Christmas Charger

A quick tip on how I space the designs on the outer rim of the plate.  Using two clear rulers, I find the center of the plate.  Then, it's just a matter of placing pieces of blue painters tape around the outside edge where I want the images to be placed.  You can step back and take a look to be sure they'll be where you want them.


Files used are from the Silhouette store.  I added some self-adhesive red gems to this.  After I got it all assembled, it looked as if it needed a little bling.

I was asked which files were used from Silhouette.  The candy shape is #34362, the swirl is the bow from a jingle bell file # 13733 and the words were created by Barbara Adkins using three free fonts and point editing.  It was shared in a Facebook group on October 2, 2013.

Rockin' Around The Christmas Tree

Rockin' Around The Christmas Tree by Brenda Lee is one of my favorite Christmas songs.  Well, that, and I Want A Hippopotamus For Christmas--but that's another story. ***and now that stupid song will be in my head all day!  Sigh!****

When I saw the center design in the Silhouette store I knew it would fit just perfectly on one of the charger plates I'm doing for a craft show.


Saturday, October 12, 2013

Peace Love Hope Charger Plate

Gold metallic vinyl.  The design is from the Silhouette store.
 

Friday, October 11, 2013

Season's Greeting Charger

Since not everyone celebrates Christmas, I decided to make this charger.  The round frame with trees and the sentiment are from the Silhouette store.


Santa Face Charger

This is done in silver metallic vinyl.  It appears white in the photo.  The Santa face and candy canes are from the Silhouette store.  This may be my favorite charger plate that I've done, so far!

Wednesday, October 9, 2013

Jingle Bell Charger Plate

The font I used is Laurenscript, the jingle bells are from the Silhouette store and the candy canes were found online.

Everything looks matte in the photo but the charger is metallic red and the jingle bells are cut from gold metallic vinyl.


Peppermint Charger Plate

Another of Kat Schriber's ideas for charger plates.  The peppermint designs are from the Silhouette store.  The snowflakes are from a Cricut cartridge. 


Peace On Earth Charger Plate

Kat Schriber was kind enough to post photos of the charger plates she'd made to give some of us on the Old Cricut Community page some inspiration.  I thought the gold design on a green plate was really nice and so I pretty much copied hers.

The center design is from the Silhouette store.  I just added some swirls from a couple of Cricut cartridges around the outer edge.

The gold vinyl cuts differently than solid color vinyl.  I had to adjust my blade depth, etc. to get a decent kiss cut.  The first time I cut it, my Cameo cut right through the backing too.  I tried to salvage the design but it has thin cuts and they got wrinkled--which did not make me happy!  I don't like to waste materials.

Monday, August 19, 2013

Testing and Reviewing Square 1 Masterpiece Adhesive Fabric

A few weeks ago I was contacted by Shawn Mosch from Crafty Chics
You may also know Shawn from  MyCutSearch, a site I rely on to help locate images on my Cricut cartridges.  She wanted to know if I would try using a new craft product called Square 1 Masterpiece in a project and write a review.   I was pretty hesitant to accept the offer.  Most things I see from design teams are pretty elaborate and, let's face it, I named my blog "Nothin' Fancy" for a reason!

It took me several days to decide how to use the Square 1 product.  I wanted to not only showcase the material, but I also wanted to test how it cut and how easily it would transfer onto a surface.

The design I chose for my test is from the Cricut cartridge Lyrical Letters.  Because the area I had to work with was relatively small, I knew it would be a wonderful test for intricate cuts.  Using my Cameo and Make The Cut software, I cut the design using the settings that work well for me when I cut vinyl.

The Square 1 Masterpiece cut cleanly and weeded easily.  Essentially it's an adhesive backed fabric. I was pleasantly surprised at how smooth the surface is.  Since it's fabric, I anticipated it having a much rougher texture. 

You can go here to find out all the details about the product: Square 1 Masterpiece website

This link will take you to Square 1 Masterpiece Facebook page.  There you will find photos of projects and can ask questions about using their product.

Like vinyl, Square 1 is on a paper backing and can be cut with a die cutting machine. Their website says that you do not have to use transfer paper since the fabric isn't stretchy.  I did use transfer paper for two reasons: 1.  It helps me to position the cut out and, 2. the design I chose to cut was quite lacy and flexible.  If I had cut a solid shape, I wouldn't have needed the transfer paper at all.

The Square 1 adhered easily onto the shiny surface of the charger plate.  The matte finish of the Square 1 makes it really stand out on the glossy surface.


I used metallic gold Oracal 651 vinyl for the words and snowflakes.  Then I embellished the tree shape with red Stickles and a pre-made red satin bow.

Make The Cut software makes it super simple to curve text.  You just place a circle the size you want on your mat, type in your text and drag it into the circle.  Voila`!  It's there.  You may want to manipulate the letters a bit depending on the font you choose.


I added snowflakes from Paper Trimmings, Accent Essentials, and Winter Lace Cricut cartridges.  They were traced and cut on my Cameo with Make The Cut software.

The font I used is Lobster Two.


So, would I recommend Square 1?  Yes, I definitely would.  It cuts cleanly, transfers easily and the adhesive on it is repositionable, which makes it safe to use on painted walls.


Thursday, December 13, 2012

Charger Plate With Vinyl Images

My first try using Make The Cut to arc lettering.  It was pretty simple once I figured out the instructions from a video on Youtube. 

I made three of these for my sisters.  Each one is a little different.  I think I like working with vinyl!  There may be some home dec projects posted in the near future!