Tuesday, July 31, 2012

A Half-sheet Collage Card

Shirley, aka Okieladybug, has started a daily FB card and layout challenge.  I'm sort of stuck on making collage cards these days so the first thing I imagined when I saw the card sketch was a clock face.

The clock face was cut from a DCWV stack named Tattered Time.  All the papers in this stack remind me of Steam Punk, which I admire but am clueless as to how anyone comes up with those things!

I used Graphically Speaking to cut the hands for the clock from shiny black paper and mounted them with a brad. I used George and Design Studio to cut a shiny black circle to mat the clock face.   The clock face is pop dotted onto the card for dimension.

Then I used several stamp sets and stamped some images onto the background.  The sentiment is also matted onto shiny black paper.

It's a rare occasion that I make anything other than A2 sized cards but this one just wouldn't have worked on one that small, so I made it a half-sheet card.

This is one collage card that I'm very pleased with!  And, I didn't scraplift this one! lol!


Collage Cards II

These were done with the Antiquities stamp collection from 3 Birds.

I like the darker background on these better than the ones I posted yesterday.  Somehow, to me, these collage cards using vintage images just need to have the inked edges and darker papers.

Whenever I go into a scrapbook store, I always look for paper with script writing on it.  My search will continue until I find just the right one!  It's a pattern that I like to use for backgrounds and it seems whenever I find it, the base color isn't quite what I want.

My desire is to have a light cream background with either grey or brown writing. But, pretty much no matter what color I find, I buy it!

A large background stamp with script on it would be wonderful.  Then I could just stamp whatever color base paper I want.

Monday, July 30, 2012

Collage Cards

 Another attempt at using some Tim Holtz distress inks and stamps to do collage cards.
 Some of the images were printed using card making software, some are TH stamps and others were pulled from various other stamp sets.
I added some paper tape on this one.
At one point, I had 15 Stampin' Up stamp cases- that I use to store my stamps in - out on the counter top looking for images to use!

I also used a couple of K& Co. embellishments.

This style of card is one that I really think is unique and mine just never seem "busy" enough when I get finished!  But, one of these days, I'll get one done that's just the way I want!

Tart and Tangy Card

The Tart and Tangy stamp set was one of the first ones I purchased from Stampin' Up when I began making cards.  I don't know what there is about the images, I just like them and they bring a cheery note to a card front, so I enjoy using them.  Stampin' Up discontinued this set after I bought them.

While searching through my Ideas folder, I saw this card today.  I found it in 2009! So, no way can I track back the person who designed it.  All I can say is that "poogsmom_4022" shows up as the tag on the jpg image.

The white tag shapes were punched with an EK Success punch.  I stamped the images with Momento inks and then matted them on paper that matched the inks.  The orange background has a scalloped edge done with an EK Success border punch. The sentiment is from Stampin' Up.

Friday, July 27, 2012

Blossom Punch Card

This is one of  Dawn Griffith's cards she demonstrated on her blog.  There's a video with complete instructions available.

It's a good way to use up patterned ribbon you may have laying around.  The card takes way less than 30 minutes to complete.


30 Minute Birthday Card

This one was seen on Pinterest and tracked back to teristampsalot on SplitcoastStampers.

I used three different sized circle punches and punched out the words that I printed with my computer.  Added some baker's twine to a couple of the circles and it's done.  What a quick, cute birthday card!


Hint:  after you tie your twine into a bow, put a tiny dot of glue onto the center of the bow.  Once it dries, it will help prevent the twine from becoming untied as the card is handled.

Mom Card

I know it's a little late for Mother's Day, but when I saw this free clip art here  I downloaded it and quickly made this card.  I'm leaving it blank inside so it can be used for stationary to write home by an OWH soldier.


Wednesday, July 25, 2012

Blue Embossed Birthday Card

I used a Cuttlebug folder to emboss the music background, then lightly inked it with some Martha Stewart ink. 

The sheet music is a free clip art image that I printed out and then tore diagonally.

The metal tags were colored with a Promarker to match the ink and base paper.

The round seal is a Martha Stewart stationary seal that I inked to match the paper.

The sentiment is a Stampin' Up stamp.  I trimmed it with some shaped scissors and inked the outer edges.

I wish I could give credit to the person that designed the card, but it was seen on Pinterest and I was unable to track back to the originator.


30 Minute Card

Need to make a really fast card?  One that can be used for many different occasions by simply changing the sentiment?  This one definitely qualifies as a 30 Minute Card.  It's just strips of punched cardstock with a single word sentiment, on a kraft paper card base.  It was inspired by a card seen on Pinterest.


Tuesday, July 24, 2012

Life's a Beach Card

The George cartridge was used to cut a 2 3/4" circle on the striped card front.  Then I adhered a 3 1/2" square of patterned paper underneath the opening.

The flip flops are free clip art images found online. They're colored with Promarkers and cut out by hand.. They're pop dotted for dimension.

 I punched a scalloped border along a scrap piece of cardstock, put it across the top of the card and used it as a template to do the scallops with a white Signo gel pen.  Using a Versamark pad, I heat embossed the sentiment and I was done!


Retro Eyeglasses Card

Anyone remember the "cat eye" glasses from the 50's?  

This idea was seen today on Facebook.  Here's a link to the original image.   The eyeglasses on the orginal were cut using a Silhouette machine, but I think the ones I used from the Paisley cartridge work quite well.

The mat was cut from the CTMH Art Philosophy cartridge.  I printed the sentiment and then fed it into a Stampin' Up punch from the back side to shape the ends and added a little ink.  The two black dots in the corner were done with a Pearl Pen.

Unfortunately, the gems on the corners of the glasses frame look dull in the photo; they're actually quite sparkly.


Monday, July 23, 2012

Masculine Birthday Card

Inspired by a card seen on Pinterest.


Mickey Card


Using the George cartridge, I cut a cream background to fit the card front with a circle cut out.  Then I layered two circles and welded them to make the red border.

The image was stamped and colored with Promarkers then placed behind the circular opening.  Honestly, I could just as easily stamped the image onto a circle cutout and adhered it to the cream background and gotten the same look!


Sunday, July 22, 2012

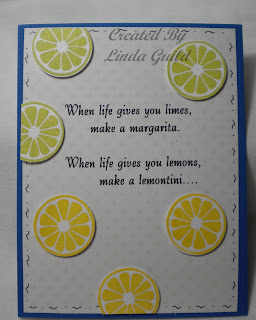
Lemons and Limes Card

The lemons and limes were stamped using Tart and Tangy stamps by Stampin' Up.  I used Pear Tart and Dandelion Memento inks.  The sentiment was computer generated.


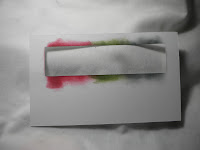
This is the inside sentiment.

Another Ombre Card

This time I used the George cartridge and made a 3 1/8" mask to use for the inking.  Memento Grape Jelly was the color I chose.

Searching through my stamps, I've realized that I need to find some larger scale floral images to use!  I really need to find a tree silhouette as well as some type of leafy vine.

Tightwad Tip -- Liquid "Brads"

Have you ever assembled a card and realized you forgot to add some brads?  Today I was making a few quick cards with a Stampin' Up Blossom Punch.  The center of the flower is a large white brad and I wanted to repeat the brads on the yellow background.  I was distracted and adhered the yellow background to the card front without inserting the brads.

So, I grabbed a bottle of Slick paint and made two small dots on the card.  Then gently tapped the card with my fingernail to flatten the dots into liquid "brads". 


Can you tell which is a brad, and which are the dots of paint?

Saturday, July 21, 2012

Ombre Card

ombre (adjective)-having colors or tones that shade into each other

Recently I saw a card online that incorporated an ombre strip with monochromatic stamped images.  Today, since it's 110° outside, I've been looking through my ideas folder for some cards to make.  It's definitely too hot to go anywhere!

I tried two methods to create a mask for applying the ink.  Blue painter's tape and cutting a stencil.  Both work but the painter's tape pulled the top layer off a couple of pieces of cardstock.  I think I achieved a sharper edge with the painter's tape when compared to my stencil though.

Using the George cartridge, I welded two rectangles and made this stencil.


I applied Memento Rhubard Stalk, Bamboo Leaves and London Fog inks with a soft sponge to the card front and then applied my stamps.


You also could just hold a piece of cardstock or scrap paper in place to create your mask, but you'll need to be sure you don't let it slip while scrubbing the inks onto the paper.

A Good Use for Striped Patterned Paper

The paper I used for this has a striped pattern on one side and a muted blue floral on the other.  Okieladybug ordered this paper from an online sale and split a package with me.  The striped side has great colors in it but it's a pattern that's a little large for an A2 card.  I just cut some wide strips and used a border punch on the edges and added a ribbon.  The large scalloped circles were cut using  Lovely Floral.

Faux Tile Card

The faux tile technique was seen on a Stampin' Up website.  It's not difficult to do at all, especially if you have a Scor-Pal or a Martha Stewart scoring board.

My cards are A2 size, so I cut a piece of white cardstock to fit onto the top half of the card front.  Using my Scor-Pal, I scored lines ever 1/2 inch, both horizontally and vertically, to create the squares.

Using Chestnut Roan ink, I lightly sponged ink over the entire surface of the grid area to make the "grout" lines more visible.  Then I used Yellow Ochre, Topaz, and Bamboo Leaves inks to stamp the leaf images onto the grid.

Made a cute, fast, fall themed card!


Friday, July 20, 2012

Super Simple Circle Card

Lori Teckler on her blog Inking Aloud  inspired this card.  As usual, I saw a photo of the card on Pinterest and had to track down the original poster to give her credit for the design.

You can use handheld punches or your Cricut and cut two different sized circles to layer.  I printed the sentiment with my computer and punched the "V" using a square punch, then added some buttons and rounded the corners.

It's a good design to use up scraps.  I was able to clear out most of the black and white patterned papers I had in my scraps folder.


Thursday, July 19, 2012

Hello Card

The phone image is on the From My Kitchen cartridge.  It was cut at 3" and I added some color with a Stampin' Up marker..  I computer generated the sentiment and put score lines on it for some dimension.


Posted Just to Remind Me

While studying some online tutorials on using punches to make different shapes, i.e. animals, I found one that explained how you could lengthen the Decorative Label punch by cutting your paper strips 1 3/8" wide and feeding in through the BACK side of the punch.  Makes perfectly good sense once you see it done and it will expand the uses for the punch since it can be used for larger stamps.

Here's the link for Flowerbug's Inkspot tutorial on how to make the punch any length you want.

So, I did this post just to remind me of how to manipulate the label punch and get more use out of it.

After wrestling with the paper, getting the right width cut, etc.  It occurred to me (DUH!)  all I needed to do was punch the shape, then cut it in half, trim off the point in the middle of the shape and then stick the halves onto the ends of the punch to make it have multiple layers.   (I never claimed to be the brightest bulb in the string!)

I trimmed off the pieces indicated with white pen marks.

Flowerbug's tutorial shows how to make a shadow for the punch.  My way of doing it is a lot easier and will work just fine for card fronts.

Wednesday, July 18, 2012

What's Cookin' Card


The pot is on page 36 in the From My Kitchen handbook.  I used a Stampin' Up border punch for the scallop across the top and computer printed the sentiment.  The face is a Peachy Keen stamp.

Cutting the tiny, tiny pieces for this shape is such a hassle that I just put the accents on the pot with a white Signo pen.

Embossed Flag Card

Pinterest is certainly a great place to find inspiration for making cards.  Patty Mowery made a card similar to this and I saw it posted on there.

The background pieces were embossed with Cuttlebug folders; I added some red strips of cardstock and put pen stitching on those.  The stars and sentiments were done with Stampin' Up punches.

I made several of these and left some without sentiments so they could be used for whatever purpose the OWH personnel want to use them for.  In a recent post on the OWH Facebook page, there was a letter from a soldier requesting patriotic themed cards.  I thought this one would make a good addition to my next shipment.

I would have listed this as another 30 Minute Card, but it did take me quite a bit longer than that to get it all laid out, embossed and assembled.  Still, it's one that you can make in just a short period of time.

Tuesday, July 17, 2012

Boston Cream Cake Recipe

I saw this on Pinterest and fixed it this afternoon.  It's quick and easy to make.  To suit my taste, I'm going to use just 1/2 can of frosting next time.  Using the whole can made it a little too sweet.

Some people call this type of cake a "poke cake" since you make the holes in it for the pudding to seep into the cake itself rather than just sitting on top like a layer of frosting.

Boston Cream Cake

1 yellow cake mix
2 small packages vanilla instant pudding
4 cups milk
1 can chocolate frosting

Prepare  13 x 9 cake according to package.
When cake is done, poke rows of holes in it using
a wooden spoon handle.

Prepare the instant pudding and let it stand about
2 minutes.  You want it to be pourable, not completely
set up.

Pour pudding over the warm cake, Spread to edges and
using the back of  your spoon, make sure the pudding
goes down into the holes you punched in the cake.

Chill thoroughly to let pudding set.

Remove lid from frosting and place into microwave for
10-20 seconds to soften.  You want it pourable, but not
completely melted.

Pour frosting  onto the center of the cake and carefully
spread it out to the edges. Put cake back into refrigerator
until frosting is completely cooled.

This cake needs to be kept refrigerated and will be more moist
the next day.

Monday, July 16, 2012

30 Minute Card

Joanneorbash posted a link on the Cricut Chat MB to a site full of digital images.  I downloaded the word circle and found the vintage typewriter in my clip art folder. By importing the images into Hallmark software, I was able to re-size them to fit a circle punch.

The card background is Tim Holtz paper and I used his die to cut the border shape. 

In the TH stack I purchased, there are several sheets of these alphabet blocks as well as some old type shapes like they used to print newspapers.  I kept looking at them and couldn't decide how I could use them on a card; I think the old typewriter ties back pretty well to the paper.  Now I can finally use these sheets.

This card serves as my prototype for the clip art image.  Since I had to print it out to verify that it would fit into an 1 1/2" circle.  Now, I'll have to do some planning and come up with a better layout to use the rest of the ones I printed!

Sunday, July 15, 2012

30 Minute Card

All the recent talk about CTMH coming out with another Cricut cartridge and stamp bundle had me taking another look at the Art Philosophy bundle I bought when it first came out.

I used a Cutlebug folder to emboss the card background and then sanded the cardstock to make the letters stand out.

The sentiment is from the stamp set that coordinates with the Art Philosophy cartridge.  I cut the shape at 1 1/4" to fit the stamp and added just a little color with a Promarker, then attached it with a couple of flower shaped brads and it was finished.

In less than an hour and a half, I completed eighteen of these, making it a great addition to my Operation Write Home card stash.

30 Minute Card

The apple on the Preserves cartridge was cut at 3" for this card.  I layered and stitched the polka dot centers and added some pen stitching around the edges.  The blue section was embossed with a Stampin' Up folder.

Another easy, quick card that can be used with a variety of sentiments.


Saturday, July 14, 2012

30 Minute Card

What child didn't have a toy xylophone growing up?  I remember my son driving me to distraction as he "played music" on his.  Little did I know that a few years later, he'd receive his first snare drum as a gift and become an excellent drummer!

This card was inspired by one seen on SplitCoast Stampers.  I used Design Studio and the George cartridge to cut the colored shapes. The strips are cut at .971" in width, the lengths were 3 3/4, 3 1/2, 3 1/4, 3, and 2 3/4".  I punched a hole for the brad 3/4" from the curved end and put them onto the card front with mounting foam.  The mallet is just a 1/4" wide piece of brown paper with a 1" circle glued onto it.


Seashell Made With Punches

Wish I could take credit for coming up with this idea, but I saw it on Splitcoast Stampers today.

I used the 1 3/4" scalloped circle punch and a 3/4" square punch for the pieces then added the shading with a Vesamark pen.  You can see the Sharpie marks where to cut the scalloped circle.

What a quick way to have a shell shape if you don't want to take time to fire up your Cricut!


30 Minute Card

This embossed oval card really only takes about 30 minutes to assemble. 

I used the Sizzix oval embossing folder from Stampin' Up and their large oval punch for the center.  Measuring the outer edge of the oval, I cut an oval with my George cartridge to 2 x 2 5/8".  That's a perfect size to fit onto the embossing folder.  The center oval measures 1 3/8 x 2" in case you don't have the large oval punch.

The sentiment is from the CTMH Art Philosophy bundle stamps.
I added some drops of Pearl Pen to the lower corner just to break up the solid blue paper and added a ribbon to conceal the seam between the two papers. 
The edges of the embossed oval were inked with ColorBox chalk ink.


Thursday, July 12, 2012

Butterfly Card

A simple card utilizing sheets of large printed design papers.  The butterfly was cut and embossed with a Cuttlebug folder; the sentiment was computer printed and punched with a Stampin' Up tag punch.


Saturday, July 7, 2012

Watermelon Card

Thanks to Dawn Griffith for the inspiration to make this card. 

I used an old Stampin Up stamp for the sentiment, printed the watermelon images and used circle punches to cut them out, a border punch on the black mat strip and added some doodling.

The watermelon rind has Glossy Accents on it to add some dimension and there are Pearl Pen dots in the upper right hand corner.

Friday, July 6, 2012

Tightwad Tip

I have a few oversized stamps that require using a large acrylic block.  I purchased one, it was really expensive and it's heavy and awkward to handle.  It often slips out of my hand smudging the image.

A friend on Facebook shared this hint with me and it works great!

Use your Cuttlebug "C" plate for your stamp block!  It's thinner than the regular acrylic blocks designed for stamps, much lighter and easier to handle.  Wish I'd known about this before I spent all that money!

This stamp is 4 1/2 x 5 3/4 and there's plenty of room left around it to grip the plate firmly.  And, yes, I did clean the stamp! LOL!  The white SU craft ink has stained the rubber. Grrr.....

Eiffel Tower Card

This card is based on one seen on Dawn Griffith's blog.  She has a great video of how to make it.  Of course, she has the newest SU stamp to use; I don't, so I made do with one of my large stamps from  And Bear Makes 3.

Once you see the video you'll understand how easy these are to make.  Essentially, stamp once on the darker cardstock with white ink and stamp with the darker ink onto the white cardstock.  Then tear the white cardstock and place the torn pieces over the white inked image.

The only ribbon I had on hand that was the correct color was just solid 1/4" gross grain so I added dots with a Pearl Pen so the ribbon would stand out from the kraft cardstock base.


Thursday, July 5, 2012

30 Minute Card

I used the Divine Swirls cuttlebug folder to emboss the yellow background, a SU border punch for the brown mat and colored three inchie stamps with Promarkers.  Then I added some white pen stitching and attached three 2" pieces of ribbon with gold brads.


Tuesday, July 3, 2012

30 Minute Cards

Crafty Queen posted a card like this on Facbook today.  It's one of those super simple, quick to make layouts that I like for Operation Write Home cards.  It took me less than 30 minutes to assemble six of these and then probably another 10 minutes to apply the heat set shapes and do some pen stitching on them.

 I used Stampin Up polka dot parade paper and a SU butterfly punch that's now retired.  But you can do this with any punch, just measure it and cut your strips that width.

This card has two of my favorite things:  butterflies and polka dots!  What's not to like?


Here's why it's so fast to make these cards.  If you're using the SU butterfly punch, cut strips of paper 1 3/4" wide.  I stacked all three of mine, centered the punch on the narrow end and punched out the butterfly.  Then I used the negative cuts for the strips.

By layering the strips, you can cut two sets; one from each end of the strips, so you have enough cut for two cards with only two punches.  What takes the time is picking up those little metal heat set embellishments and getting them onto the card after you drop them a couple of times!